
Showing 741 through 760 out of 1000 articles containing "table"

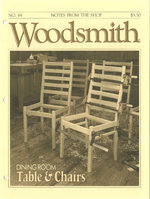
Formal Dining Chair
…sanded smooth, round over all four edges with a W' round-over bit on the router table, see Step 6. MATERIALS LIST A Back Legs (2) 1 Vi6 x 4 - 39 rgh. B Front Legs (2) 13/8X1%-17% …. Since the back seat rail (E) is straight, clamp a straightedge to the drill press table to keep the mortises centered on the workpiece. But on the curved top rail …Read More
Woodsmith Issue 64
August 1989

Using Templates
…template makes cutting out the pieces a simple two-step operation on a band saw and router table — a process that produces all the pieces you want with the exact same shape. template. I …oversize, you can rout off the last Vt6" with a flush trim bit on the router table. (For sources of flush trim bits, see page 24.) With the template still taped …Read More
Woodsmith Issue 64
August 1989

Tips & Techniques
… into a scrap block (inside the drawer), see Fig. 1. CLEAN ROUTING Sometimes when using the router table, it's tough to get a clean finished cut that doesn't burn. To get a good cut, I use… is set, tape a piece of cardboard (approximately V&2"-thick) to the top of the router table, in front of the bit. The cardboard should be about as long as the…Read More
Woodsmith Issue 64
August 1989

Shop Notes
… BOLT UNTIL 1W IS EXPOSED 3 \j //■? CORNER BLOCK r* /jt^y^ TABLE / L .^""^""'^ & ■~~- ^T~ LEG >^ HANGER----- / A jr^ BOLT / /) % - / It ■' >^r / /// -r -Pk* — /Ai L-' Sw*—NUT / n ^-… 6" piece of tape tightly from the top of the table around the edging, see Fig. 1. Now, move the …Read More
Woodsmith Issue 64
August 1989

Talking Shop
… being cut 011 a drill press? Have you considered cutting them on the router table by plunging the ■wood piece down on the bit? John H. Righi Onekama, Michigan Without …which need mortises in exactly the same locations, yes, I probably would use the router table. Because then the time of setting up start and stop blocks isjustified. MITER …Read More
Woodsmith Issue 64
August 1989


Oval Box
…. auxiliary fence. To rout this shadow line, mount a Vf straight bit to the router table and set the bit %2M high, see Fig. 11a. Then I clamped an auxiliary fence (a piece of ■V411 plywood) to thefront of the router table's regular fence. Now turn on the router and slide the auxiliary fence into the …Read More
Woodsmith Issue 65
October 1989


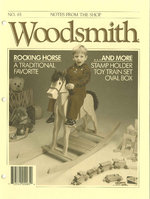
Train Track
… (see Woodsmith No. 51). Or, just clamp a piece of 3/t" plywood to your band saw table, see Fig. 4. If you're using the circle jig, position the pivot point 1634" … see Fig. 8. (To make the blocks, trace the shape of the curved track onto plywood.) TABLE SAW FENCE -^ AUXILIARY FENCE l^'-~Ps ROUTER TABLiV CONNECTORS To join the pieces of track …Read More
Woodsmith Issue 65
October 1989

Tips & Techniques
… be misinterpreted and could be very dangerous. The original drawing (left, below) shows a router table with a 14" round-over bit. The chair slat is being pulled through the bit …when you make the cut, the guard should always be securely mounted on the router table to protect your fingers. 2. You should feed against the rotation of the bit. The …Read More
Woodsmith Issue 65
October 1989


Bandsawn Dovetails
…, see Fig. 1. It sits directly on top of the band saw table, refer to Fig. 4. (I found this bigger table useful for other projects as well.) ADD RUNNER. To hold … The runner slides in the blade slot on the auxiliary table. turnbuckles. The auxiliary table is held down to the band saw table with a couple of turnbuckles. To make the turnbuckles, …Read More
Woodsmith Issue 66
December 1989

Dovetails: The Pins
… of the jig, see Fig. 1. This runner fits in the groove cut across the auxiliary table (perpendicular to the blade). To hold the runner, cut a W'-deep dado centered on the bottom…, see Step 7. 7 To trim off just a hair more, keep the pinjig clamped to the auxiliary table and tap the jig with a mallet. You should be able to move it a little without…Read More
Woodsmith Issue 66
December 1989

Dovetails: The Tails
…hold the workpiece at a 10' angle to the blade. To position the fence, I used my table saw's miter gauge, see Fig. 2. stop fence. The last part to make is a stop fence…at scribed base line, right drawing. 6 Next, clamp the stop block down to the auxiliary table with a C-clamp. Then follow the cutting sequence in box at right. Between cuts, add the…Read More
Woodsmith Issue 66
December 1989

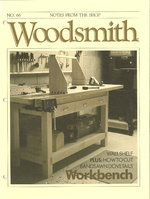
Wall Shelf
… right side of the shelf, lay the piece down on the router table and 2 MARK CENTER MA['K ^-OF BIT ON FENCE^__STOP POINT ^\\^^^T^^^ FRONT ■^iC^^J^^^^^^^^T EDGE J SS… marks align when the piece is flat on the table. Then push the workpiece across tlie router table moving from right to left, see Fig. 3. Shop Note…Read More
Woodsmith Issue 66
December 1989

Shop Notes
… Jigs and fences are great for aligning and guiding work-pieces. For example, on a table saw iff need to cut several pieces to the same length, I attach a simple …. On other equipment that creates chipsof wood in addition to sawdust Oike a router table or drill press), I make the chamfer even larger, see Fig. 2. dovetail spacers. Relief …Read More
Woodsmith Issue 66
December 1989

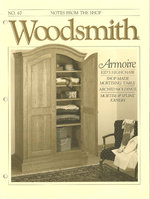
Armoire
… was simple. It involves an inexpensive panel-raising bit and a simple set-up on a router table. (This technique is explained in Shop Notes on page 16.) DETAILS. As with any …each panel. Since I used a raised panel bit without a bearing on the router table, I had to use the router table fence to guide the edge of the panel. (Note: To rout the …Read More
Woodsmith Issue 67
February 1990

Arched Molding
…, see Step3. Next, fasten the template blank down on a sheet of plywood or a large table. (I held it with double-sided carpel tape.) To draw the two smaller arcs, position… ARCHED MOLDING BLANK BASE s) MOLDING POSITION L-GUIDE BLOCK 3Vl&" FROM BLADE ¥ the band saw table so the distance between the blade and the block is about Vie" wider than…Read More