
Showing 921 through 940 out of 1000 articles containing "table"

Veneering
…pieces together. Cut to size. Cut the core and veneer to size on the table saw. Afine tooth blade reduces chipo%it — especially on crosscuts. tact adhesive bonds instantly.… attached to the core, you can immediately cut the panel to size. I used the table Woodsmith Joining the pieces. As the veneer pieces are butted together, use clear strapping…Read More

Woodsmith Issue 97
February 1995

Apothecary Cabinet
… (9) 3/4 X 3Vl6 - 37/l6 J Drawer Bottoms (9) 2% x 79/t6 - '/4 ply HARDWARE • 1" dia. Birch Knobs (9) router table, see Figs. 1 and 2. A stack dado set will also work, but only the…length by trimming the slightly-long blanks one at a time using the table saw in conjunction with the rip fence, see Fig. 5, Safety Note: I don't ordinarily…Read More
Woodsmith Issue 97
February 1995

Shop Notes
… of the leg, see Fig. 2. Then /VOTE: ___I Tapered edge rides against table saw fence Waste position the table saw rip fence so the blade aligns to the waste side of the…. Then I sanded the grooves until the drawers slid smoothly. CUT GROOVES. A dado blade in the table saw works best to cut the grooves. Use a scrap piece to test the width, see…Read More
Woodsmith Issue 97
February 1995

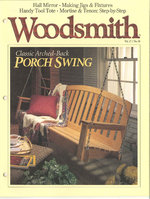
Hall Mirror
… on both pieces of molding. To do this, I used a V2" cove bit in the router table. Shop Tip: It works best to start on the ends first. That way, any chipout… W\ see Figs. 6a and 6b. To create the beading, I used a W roundover bit in the router table. PEGS. With the molding installed, the next step is to add Shaker pegs to the…Read More
Woodsmith Issue 98
April 1995

Tool Tote
…or fancy hand-cut dovetails, I used box joints. The fingers are cut quickly on the table saw. Then they're pinned with dowels. This tool tote also includes a shallow sliding … finger, see Fig. 1. To do this, I made multiple passes over a combination blade in the table saw, see Fig. 2. First, lay out the fingers on the side pieces. Each finger …Read More
Woodsmith Issue 98
April 1995

Mortise & Tenon
…the back of the porch swing.) Or when connecting two legs with a stretcher (like a table or chair). And for special applications, the mortise and tenon has a number of variations.… mortise and tenon joint is easy to make. All it requires is a drill press and a table saw. The hardest pail is cutting multiple mortise and tenon joints all identical so…Read More
Woodsmith Issue 98
April 1995

Jigs & Fixtures
…attached as runner on a jig. The runner fits in the miter slot on a table saw or router table. Phenolic plastic doesn't absorb moisture, so it won't swell or shrink. That…two thin support rails. l»» ►* Plexiglas. Plexiglas covers the blade on the sliding cut-off table and is used for a hairline indicator on the stop block. Phenolic runner. The …Read More
Woodsmith Issue 98
April 1995

Tips & Techniques
… FEATHERBOARD ■ A featherboard is a good idea whenever you rip long or narrow pieces on the table saw. But it can take forever to get it in position and clamped …to the fence drill two counterbored A Once tlie featherboard fence is clamped to the table saw, the featherboard can be positioned anywhere along the workpiece. A couple wing nuts on…Read More
Woodsmith Issue 98
April 1995

Shop Notes
…for sabre saw -"■"* CHAMFERING A DOWEL ■ For the tool tote on page 26,1 used the router table to chamfer the ends of the dowel handle. First install a chamfer bit in the router and raise it so the cutter is Vs" above the table. Then to prevent kickback, I created a "channel" that holds the dowel. This is done by …Read More
Woodsmith Issue 98
April 1995


Small Box
…easy to get at the waste in the middle. I used the table saw to cut off these front and rear pieces, see Step 1. …Remove both the front and rear sections from the blank on the table saiv. The straight joint line is nearly invisible when the … side. To do that, use a straight bit in the router table and flip the lid end-for-end after each pass. It's…Read More
Woodsmith Issue 99
June 1995

Tower Bookcase
…, I used a W straight bit in a hand-held router. I was tempted to use a dado blade in the table saw. But the pieces are just too long to handle easily. Especially when you're… the ends of the shelves. To cut the W-wide groove, I used a dado blade in the table saw. Note: The grooves should be centered on the thickness of the shelves so they…Read More
Woodsmith Issue 99
June 1995

Finishing Fixes
…hand, I'm sometimes surprised at what a good cleaning will do. With one project, the Shaker side table shown in the photos below, the top was badly stained. In fact, my first instinct…every scratch or dent. Out-of-the-way scratches, like those on the legs of a table, aren't noticeable (after the color has Cleaning tight spots. When you've got to …Read More
Woodsmith Issue 99
June 1995

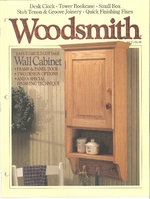
Cottage Wall Cabinet
… sides, almost all the work is done on the table saw. options. Of course it doesn't matter how easy a …cut a single, 3/4"-deep rabbet for both, using a dado blade in the table saw. To do this, first attach an auxiliary fence …along the sides and ends. To complete the profile, I used the table saw again, this time standing the panel on edge, see …Read More
Woodsmith Issue 99
June 1995

Stub Tenon & Groove
…see Fig. 1. Also, it's important to keep the workpiece pressed down against the table, see drawing below. If it lifts during a cut, there will be a step … seating (n~ \ ^ 1 vp ( V___ / Downward pressure. Hold the work-piece firmly against the table to prevent stepped cuts in the bottom of the groove. 12 Woodsmith No.…Read More
Woodsmith Issue 99
June 1995

Shop Notes
…■ To make the raised panel for the cottage wall cabinet (featured on page 6), I used the table saw. But to do it safely, I buitt a quick jig that holds the panel securely during…the spacer. Note: The side piece that holds the panel should be square to the table after assembly. CUTTING THE PANEL. It's easy to cut a raised panel. Just install it on…Read More
Woodsmith Issue 99
June 1995


Three Board Shelf
… of each bracket, see Fig. 5.1 did this with a Vi" straight bit in the router table. And to make this procedure safer with such a small workpiece, I added an auxiliary base to cover the large opening in the table. Then I clamped a scrap block to the fence to act as a stop. ASSEMBLY. With the …Read More
Woodsmith Issue 100
August 1995

Dovetail Chest
… blanks. Next, cut a decorative chamfer along the top edge, see Fig. 6.1 did this on the table saw with the blade angled 15°. Then to complete the base, miter the pieces to…'s around the base. But the panel is too long to stand on end on the table saw. So I used a block plane. Before planing, lay out the edges of the chamfer, see…Read More
Woodsmith Issue 100
August 1995

Tips & Techniques
…in place ROUTER FENCE INSERTS ■ I need a large opening (for clearance) in my router table fence when using large bits. But a large opening isn't safe when routing small … COCK KNOBS ■ A quick replacement for large plastic knobs, like you'd find on a router table, is a carriage bolt and a sill cock handle (the metal handle from a water spigot),…Read More