Showing 961 through 980 out of 1000 articles containing "table"


Full-Length Mirror
… I like about using half laps is they’re easy to set up on the table saw, yet they provide a relatively strong joint once they’re glued together. MATERIALS A B C D E Segments (3)…previous page. This may sound complicated, but it’s a simple two-step procedure on the table saw. Start with a 5"-wide scrap piece. Then stand the piece on end and make a…Read More
Woodsmith Issue 104
April 1996

Tips & Techniques
… before cutting out the next wedge. Leroy Davison Ida Grove, Iowa 1 2 Tall Featherboard I use a table saw when cutting grooves in the edge of a workpiece. But to keep tall pieces …The block is attached to a runner that fits in the miter guage slot of the table saw. Instead of using clamps to hold the featherboard in position, the runner expands …Read More
Woodsmith Issue 104
April 1996

Shop Notes
…groove joint is an accurate set up. 1 2 12 Woodsmith No. 104 Bevel Jig Typically, I use a table saw to cut a bevel on a workpiece. But trying to bevel the bottom side of the…a problem. It just wasn’t safe to stand this large panel on end and use the table saw. The solution was a shopmade jig that holds a router at an angle. With a straight …Read More
Woodsmith Issue 104
April 1996

Photo Box
… pieces (A, B, C) to hold a 1 " hardboard bottom, see Fig. 2. / 8 GROOVES . While I was at the table saw, I also cut grooves for three 1/ " 8 hardboard dividers that are added later, see …it’s time to concentrate on the dovetails. Routing these dovetails is easy. A router table and a 1/ " dovetail 2 bit are all you need, see Fig. 4. But I wanted to …Read More

Woodsmith Issue 105
June 1996


Cabriole Legs
… to guide the leg and clamp a stop block to the fence. No. 106 fee table, the patterns for the transition blocks are slightly different, see details ‘a’ and ‘b’ on page … I sand the faces with a drum sander on the drill press. (You’ll need an auxiliary table to do this.) < Align transition blocks on reference lines and carefully glue them in …Read More
Woodsmith Issue 106
August 1996

Staining End Grain
… wood, darkening the ends much more than the face. table on page 20, the stain with the color I liked happened …a traditional oil-base stain. The problem was the table was curved. In fact, this table threw me more than one curve. For one…. I didn’t want light streaks around the edge of the table, so I went back to the sanding solution and sanded …Read More
Woodsmith Issue 106
August 1996


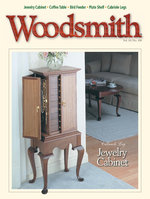
Jewelry Cabinet
…. The case will be attached to the base later with metal table top fasteners. To accommodate these fasteners, I cut a 1/ "-wide groove 3/ " 8 8 deep on…1!/2"-tall Teardrop pulls with 1"-dia. Back Plates (2) #8-32 x 1" Brass Rh Machine Screws (6) Z-shaped Table Top Fasteners (4) #/16"-dia. Rubber O-rings (10) #8 x 1!/2" Fh Woodscrews (8) 11/8"Brass …Read More
Woodsmith Issue 106
August 1996

Tips & Techniques
… the back. Mark Cordes Shoreview, Minnesota Stopping Insert Rattle The metal inser t on my table saw used to rattle whenever the saw was running. To eliminate this, I simply put a… sup- port to a sawhorse so the top of the roller is aligned with the table on your saw. William McMullen Milford, Connecticut Drill Press Fence Drilling long pieces of…Read More
Woodsmith Issue 106
August 1996

Shop Notes
…. It’s just a 3/ "4 thick auxiliary fence that’s attached to the miter gauge on the table saw. Then a small locating pin is mortised into the bottom. MAKING THE JIG. …2 3 a. a. MORTISING PRE-MADE CABRIOLE LEGS One option that makes the jewelry cabinet and the coffee table easier to build is to purchase the legs instead of making them, see photo.…Read More
Woodsmith Issue 106
August 1996

Talking Shop
…the bit pulls itself forward as it digs into the workpiece. On a router table, this can be disastrous. The router can actually pull the workpiece (and your fingers) rightintotherouterbit.For this reason, I avoid backrouting on a router table. Backrouting with a handheld router is another story. Since the workpiece is clamped down …Read More
Woodsmith Issue 106
August 1996

Reader's Jig
…jig consists of a long carriage that guides the saw through the cut. A fence and plywood table allow the carriage to be adjusted to different angles for miter cuts. CARRIAGE. Since … the pivot point, position the carriage so the saw blade is centered on the table and fence. Then, drill a 1/4"-dia. hole through one of the carriage rails and the …Read More