
Showing 141 through 160 out of 192 articles containing "box joints"

Mortise & Tenon
… mortise and tenons. But these don't require new skills. They simply apply the basic joint to a new situation. mechanical strength. Besides being versatile, the mortise and tenon is strong. … the waste between the end holes and clean the sides, see Step 2 and the box on the next page. clean morose. When the mortise has been drilled, all that's …Read More
Woodsmith Issue 98
April 1995

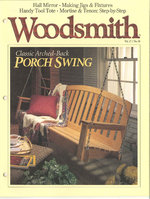
Porch Swing
… And for extra strength, the back of the swing is built with mortise and tenon joints. COMFORT. Strength is important in a project that's going to support the weight of a person …parts of the swing together. Aid drilled countersunk shank holes for all the screws, see box at right. For more on outdoor woodscrews, see the article on page 30. SEAT …Read More
Woodsmith Issue 98
April 1995

Molded Stub Tenon
…table saw, a router, a chisel, and a shop-made jig (see the box below). SIZING. The first step to making a "perfect joint" is to make sure your stiles and rails are cut…the doorframe, I cut these grooves a little deeper (W) than the grooves for a typical stub tenon joint. This added depth strengthens the door frame once the plywood panel is glued …Read More

Woodsmith Issue 101
October 1995

Cutting Board
…glue that holds the top together. The result is the joint lines split open (usually at the ends), see the box at right. To prevent this, I use water resistant … grain. I used five of my best ^ Joint separation. On many cutting boards the joints split open from excess moisture. To prevent the joint from opening completely, a dovetail-shaped key …Read More

Woodsmith Issue 102
December 1995

Full-Length Mirror
…(C), see exploded view at right. The stiles and rail are joined together with a half lap joint. This joint is easy to cut yet it’s relatively strong when glued together, see Fig. 7 and… I used a simple jig to help hold them ver tical while cutting the grooves, see the box at lower right. FRAME ASSEMBLY. With the grooves cut, the frame can be glued …Read More

Woodsmith Issue 104
April 1996

Shop Notes
…square mortises for the spindles. W 1 2 3 Double Groove Joint When installing a solid wood panel in a frame (like the lid for the stacking boxes on page 14), you have to allow for wood movement. One way to tackle this problem is by using a simple interlocking double groove joint. This joint is …Read More
Woodsmith Issue 104
April 1996

Router Bit Cabinet
…Normally before I glue a box together with mitered corners, I add splines for strength. I used splines this time too. But instead of putting them on the inside of the joint, I added them …the router at an angle so the slots can be cut perpendicular to the joint. A guide bushing attached to the router base follows a template on the jig, and a 1/ " …Read More

Woodsmith Issue 105
June 1996

Mail Organizer
…final width. (The final width of my base pieces was 95/8"). CUT FINGER JOINTS . Now the finger joints can be cut on the bottom and end pieces, refer to page 14. I …create a compartment for pens, stamps, and other supplies, I added a pencil tray inside the drawer, see box below. W HALF-LAP PENCIL TRAY To keep the inside of the drawer as organized …Read More

Woodsmith Issue 110
April 1997

Shop Notes
…slipping off the surface of my workpiece. 1 a. 2 a. 1 2 Finger Joint Kerfs Before making the finger joints for the projects in this issue, you may …joint boxes, I use a simple techinique. Instead of trying to cut plugs to exact thickness for the holes, I simply use the test piece I have left over from cutting the finger joints for each box…Read More
Woodsmith Issue 110
April 1997

Garden Arbor
…ASSEMBLY. Now the arches are ready to be glued together, see Fig. 7. To hold the joint together, I clamped a pair of cleats to each piece and then clamped the cleats together. …the bars in place, I disassembled the arbor and gave it a few coats of finish, see box below. FINISHING THE ARBOR When finishing an outdoor project, you want to protect the …Read More

Woodsmith Issue 111
June 1997

Three-way Miters
… the jewelry box. This creates an opportunity for a unique woodworking joint: A three-way miter. A dding the walnut edging was a great way to “dress up” the jewelry box on page 14. But it also made for some interesting woodworking. At each corner, where three edging pieces meet, you need a special joint: a three-way …Read More

Woodsmith Issue 112
August 1997

Curio Cabinet
…width of the opening (119/ "). 16 The next step is to cut the bridle joints. This simple joint can be cut quickly on the table saw, see the article on page 26. (Note that this article describes making molded bridle joints. The joints on these doors are regular bridle joints, so they’re even easier, refer to the box on page 27.) With the doors glued…Read More

Woodsmith Issue 113
October 1997

Holiday Centerpiece
… a pattern exactly. Nevertheless, we’ve supplied a couple of patterns to serve as guidelines. MUSIC BOX MOVEMENT. After building the prototype for this centerpiece, we decided it might be nice … be glued to the top of the trunk, using an 1/8" dowel to strengthen the joint, see drawing at top of page 26. FINISH. Wiping or brushing a finish on this …Read More

Woodsmith Issue 114
December 1997

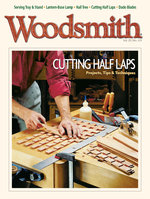
Cutting Half Laps
… cleaner half lap cheeks, but it requires a different technique with an extra setup, see box below. SETUP. After some light finish sanding, it’s time to assemble the frame, see … end up under the workpiece and affect the depth of the cut. Assembling thin lap joints can also require a different approach. If there’s a frame to glue up, as in the …Read More
Woodsmith Issue 115
February 1998

Shaker-style Rocker
…, the 4 1"-dia., 11/ "-long tenon has a round 2 shoulder that’s created with a 1/ "-dia. core box bit, see detail ‘b’ and page 15. ROUT PROFILE. I also decided to “lighten” the … legs.) 4 I started with the 3/ "-long tenons on the backrest posts (C). Set the core 4 box bit to leave a 3/ "-dia. tenon. (Mine 8 was 1/ " high.) But again for a good fit,…Read More

Woodsmith Issue 117
June 1998

Decorative Splined Miters
…box with miters, I have to decide whether or not the joint should be reinforced. I like the clean look of miters, but they don’t put up with a lot of abuse. So if the box… I reinforce a miter by adding splines. They cross the joint line, creating a lot more glue surface to… the corners of the box. To cut across the joints, the box has to be held at …Read More
Woodsmith Issue 118
August 1998

Picture-Perfect Miters
…miter gauge slot. The miter gauge should slide freely without any sideto-side movement, see box below. After taking care of any play in the miter gauge, check the saw …a perfectly square frame. It’s more important to examine the fit of each individual joint. TRIMMING. If the joints aren’t tight, you may have to pare away material from the ends of …Read More

Woodsmith Issue 121
February 1999

Drilling Mortises
…. of Forstner bits, you can use a brad point bit and drill non-overlapping holes, see box on opposite page.) LAYOUT. But before you chuck the bit in the drill press, the… mortise makes it a whole lot easier to cut the tenon and end up with a strong joint — and that perfect “sliding” fit. W MORTISING WITH A BRAD POINT BIT If you don’t own a set…Read More

Woodsmith Issue 124
August 1999

Under-Bed Storage
… my back. JOINERY . The corners of this box are joined with machine-cut dovetail joints. If you’ve never used a dovetail … a dovetail jig, you can use rabbet joints to connect the ends of the box with the front and back.… see the box on the opposite page. CUT DADOES . The interior end pieces are joined to the front and back with a simple dado joint…Read More
Woodsmith Issue 125
October 1999

Machine-Cut Dovetails
WOODWORKING TECHNIQUE MACHINE-CUT DOVETAILS With a router and a dovetail jig you can cut a perfect-fitting joint in seconds. The trick is getting the jig set up properly. I still remember the first…-sized half-pins at the top and bottom). When you’re making a drawer or box, half the joints are cut on the left side of the jig and half are cut on…Read More